There’s nothing quite as frustrating as watching your beautiful spring roll wrapper tear apart just as you’re about to complete that perfect roll. One moment you’re channeling your inner chef, and the next, you’re staring at a sticky, shredded mess that looks more like a culinary crime scene than an appetizer. But here’s the good news: making flawless spring rolls isn’t some mysterious art reserved for restaurant chefs—it’s totally doable once you know the tricks.
Whether you’re prepping for a party or just craving something fresh and delicious, mastering the art of wrapper handling will transform your spring roll game forever. Let’s dive into the secrets that’ll have you rolling like a pro.
Understanding Your Spring Roll Wrappers
Before you even think about rolling, you need to understand what you’re working with. Rice paper wrappers are delicate, temperamental, and completely unforgiving if you don’t treat them right.
Here’s what makes them tricky:
- They’re brittle when dry and can become gummy when over-soaked
- They continue to soften after you remove them from water
- Different brands have different thickness levels
- Room temperature affects how they behave
The key is finding that sweet spot where they’re pliable enough to roll but not so wet that they stick to everything (including themselves).
The Soaking Technique That Changes Everything
This is where most people go wrong. You might think dunking your wrapper in water like it’s a tea bag is the way to go, but patience is actually your best friend here.
The Perfect Soak Method:
- Fill a large, shallow dish with lukewarm water (not hot!)
- Submerge one wrapper completely for just 5-10 seconds
- Remove it immediately when it starts to feel slightly soft
- Lay it flat on a clean, damp kitchen towel or smooth cutting board
- Wait 30-45 seconds—this is crucial! The wrapper will continue softening
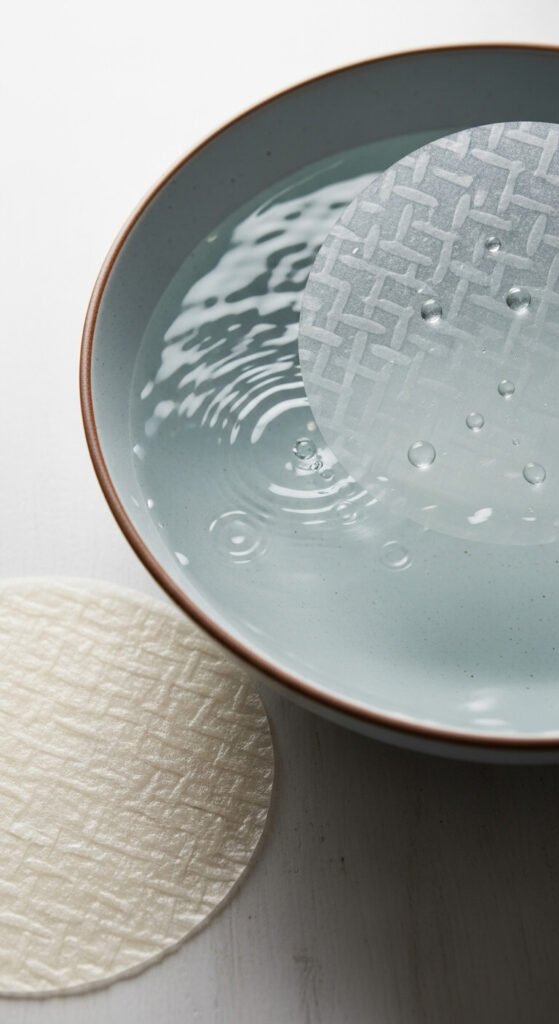
Pro tip: Never soak multiple wrappers at once. They’ll stick together faster than you can say “spring roll,” and you’ll end up with an unusable clump.
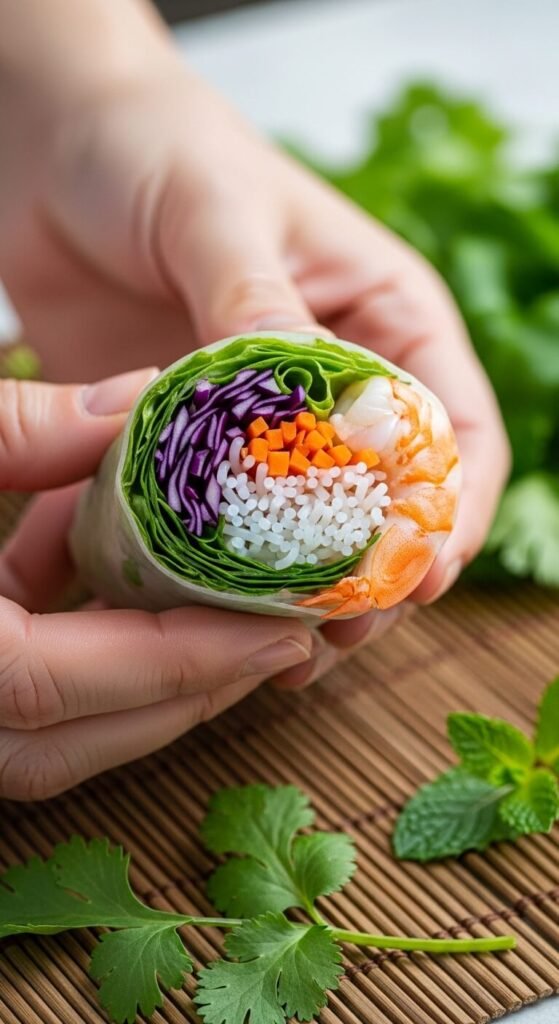
Prep Your Fillings Like a Pro
The secret to tear-free rolling isn’t just about the wrapper—it’s also about what you’re putting inside. Your fillings need to be wrapper-friendly.
Follow these filling rules:
- Cut everything into thin, uniform matchsticks
- Pat all ingredients completely dry with paper towels
- Avoid super crunchy items that might puncture the wrapper
- Keep portions modest—overstuffing is wrapper enemy #1
- Lay out all your prepped ingredients within easy reach
Think of lettuce as your wrapper’s bodyguard. Placing a lettuce leaf down first creates a protective barrier between delicate rice paper and any sharp veggie edges or hot proteins.

The Rolling Technique That Never Fails
Now for the moment of truth. With your softened wrapper and prepared fillings ready, it’s time to roll.
Step-by-step rolling:
- Place your lettuce leaf in the center-bottom third of the wrapper
- Add your fillings in a tight, horizontal line (leave 2 inches on each side)
- Fold the bottom edge up and over the filling
- Tuck it under the filling tightly—this is your anchor
- Fold in both sides like you’re wrapping a burrito
- Continue rolling forward firmly but gently
- The wrapper’s natural stickiness will seal it closed
The key word here is confident. Hesitant, slow rolling gives the wrapper time to stick to itself in weird ways. Move with purpose, but not force.

Troubleshooting Common Wrapper Disasters
Even with perfect technique, things can go wrong. Here’s how to handle wrapper emergencies:
Wrapper too sticky? Your water was too hot, or you soaked it too long. Start fresh with cooler water and a shorter soak.
Wrapper tearing during rolling? You either overfilled it or there’s a sharp ingredient poking through. Use less filling next time and double-check for pointy edges.
Wrapper still hard in spots? It wasn’t submerged evenly. Make sure your dish is large enough for complete submersion.
And here’s a secret: if a wrapper does tear, don’t panic. Just wrap a second wrapper around the whole thing. Problem solved, and it’ll actually be sturdier!
Storing Your Perfect Spring Rolls
You’ve conquered the rolling—now keep those beauties fresh.

Place finished rolls on a plate lined with damp paper towels, and cover them with another damp towel or plastic wrap. They’ll stay perfect for 2-3 hours in the fridge. Don’t stack them directly on top of each other—they’ll stick and tear.
Your Spring Roll Success Starts Now
Making spring rolls without wrapper casualties isn’t magic—it’s just technique. Remember: lukewarm water, brief soaking, patience while the wrapper softens, smart filling choices, and confident rolling. Master these five elements, and you’ll never look at spring rolls the same way again.
Now that you know the secrets, it’s time to get rolling (pun absolutely intended). Save this guide for your next spring roll adventure, and watch those wrappers behave exactly as they should!